Chocolate Mint Slice Bars
Highlighted under: Dessert Inspirations
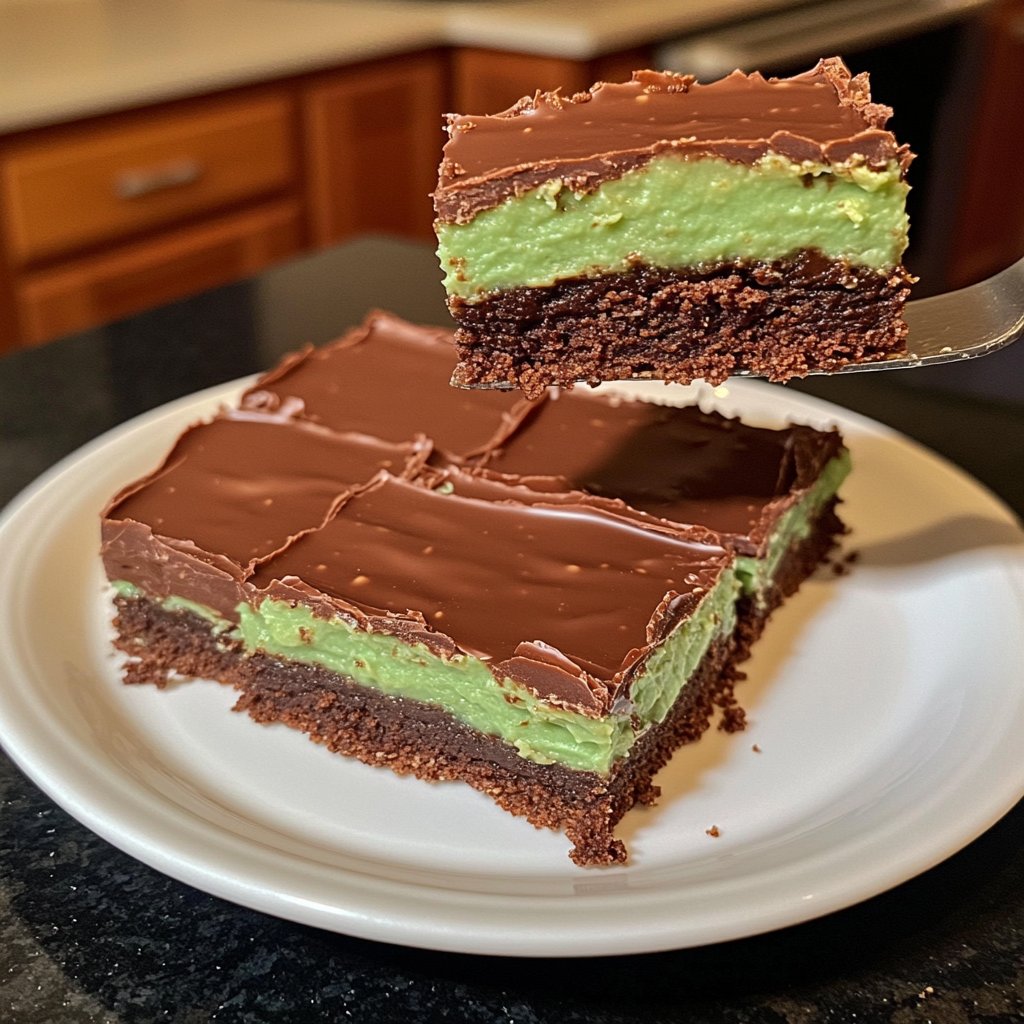
I absolutely love making Chocolate Mint Slice Bars, especially when I want to impress friends and family. The combination of rich dark chocolate and refreshing mint delivers a delightful twist that’s hard to resist. This no-bake treat is not only quick to whip up, but it also looks so elegant on any dessert table. Plus, the layers of chocolate and mint are perfect for satisfying both a chocolate lover’s cravings and a desire for something refreshing. Trust me, these bars will be a hit at your next gathering!

When I first decided to make Chocolate Mint Slice Bars, I was hesitant about how the flavors would blend. However, after testing a few variations, I discovered that balancing the chocolate with just the right amount of mint extract creates a heavenly combination. My secret tip? Always sift your powdered sugar to avoid lumps in the mint layer.
During a recent gathering, these bars stole the show! Everyone raved about how the creamy mint center paired perfectly with the crunchy chocolate base. I love preparing these bars in advance, letting them chill overnight, and serving them chilled for the best texture.
Why You'll Love These Bars
- Decadent chocolate paired with a refreshing mint layer
- Easy to make and perfect for dessert tables
- No-bake method saves time and effort
Creating the Perfect Chocolate Base
The chocolate base of these bars sets the foundation for a delicious treat. The combination of crushed digestive biscuits, melted butter, and cocoa powder not only imparts flavor but also provides a satisfying crunch. Be sure to press the mixture firmly into the baking dish; this ensures that the base holds together when you cut the bars later. A flat-bottomed measuring cup works well for this task, ensuring even pressure across the surface.
If you don't have digestive biscuits on hand, graham crackers could serve as a great alternative, giving a similar texture and sweetness. For a gluten-free option, consider using gluten-free biscuits or almond flour. Adjustments in the quantity may be needed depending on the biscuit's texture, so feel free to experiment to find the right consistency for your base.
Getting the Mint Layer Just Right
The mint layer is where the magic happens, balanced with sweetness and a fresh kick. When mixing the powdered sugar, softened butter, and peppermint extract, aim for a smooth, creamy texture. If it feels too thick, a splash of milk can help achieve the desired consistency. Remember that the peppermint extract can be potent, so adjust the amount based on your taste preference; start with less and add more if needed.
A key visual cue for the mint layer is its color: if you opt for the green food coloring, add it gradually until you reach the desired hue. Not only does it make the dessert visually appealing, but it also adds to the festive look if you're serving these at a special occasion. Letting the mint mixture rest at room temperature for about 5-10 minutes before spreading it helps it adhere better to the chocolate base.
Finishing Touches: The Chocolate Topping
The chocolate topping adds a rich finish to your slice bars, and getting the melting process right is essential for a glossy, smooth finish. When melting the dark chocolate and coconut oil, keep the heat low to prevent burning, stirring frequently. Remove from heat once the mixture is smooth and glossy; if it looks grainy, it may have overheated. You may need to start fresh with new chocolate if this occurs.
Once you pour the chocolate topping over the mint layer, use a spatula to smooth it evenly. Chilling the bars for at least 2 hours is crucial; this allows the layers to set correctly, making it easier to cut into clean squares. If you're in a hurry, placing them in the freezer for about 30-45 minutes can expedite the process, but be cautious not to freeze them solid.
Ingredients
Chocolate Base
- 200g digestive biscuits, crushed
- 100g unsalted butter, melted
- 50g cocoa powder
Mint Layer
- 300g powdered sugar, sifted
- 150g unsalted butter, softened
- 2 tsp peppermint extract
- Green food coloring (optional)
Chocolate Topping
- 200g dark chocolate, chopped
- 50g coconut oil
Instructions
Prepare the Base
In a large bowl, combine the crushed biscuits, melted butter, and cocoa powder. Mix until well combined. Press this mixture into the bottom of a lined baking dish and set aside.
Make the Mint Layer
In a separate bowl, beat together the sifted powdered sugar, softened butter, peppermint extract, and food coloring until smooth. Spread this mint mixture evenly over the chocolate base, smoothing the top with a spatula.
Add the Chocolate Topping
In a saucepan, melt the chopped dark chocolate and coconut oil over low heat until smooth. Pour this mixture over the mint layer, spreading it evenly. Chill in the refrigerator for at least 2 hours or until set.
Slice and Serve
Once set, remove the bars from the baking dish and cut them into squares. Serve chilled and enjoy the delightful combination of chocolate and mint!
Pro Tips
- For an extra touch, sprinkle some crushed peppermint candies on top of the chocolate layer before it sets. This adds a great crunch and a festive look to your bars!
Storage and Make-Ahead Tips
These Chocolate Mint Slice Bars can be made a couple of days in advance, making them perfect for preparing ahead of a gathering. Once set, store the bars in an airtight container in the refrigerator. They will stay fresh and delicious for up to one week. For longer storage, they can be frozen, but it's best to slice them first and layer parchment paper between pieces to prevent sticking.
When you're ready to serve the frozen bars, allow them to thaw in the refrigerator for a few hours. This prevents them from becoming too soft too quickly, maintaining their delightful texture. You could also serve them slightly frozen for a refreshing treat on a warm day, giving another dimension to the minty flavor.
Creative Variations to Try
While the classic version of these bars is irresistible, you can easily customize them to suit different tastes. Consider adding crushed nuts, such as walnuts or pecans, to the chocolate base for a delightful crunch. Alternatively, you could mix in some dark chocolate chips into the mint layer for an extra chocolaty surprise with every bite.
For those who love a bit of heat, a pinch of sea salt sprinkled on top of the chocolate layer can enhance the flavors beautifully. You might also experiment with flavored extracts—like vanilla or almond—in the mint layer to create a unique twist that contrasts nicely with the chocolate.
Questions About Recipes
→ Can I use a different type of chocolate?
Yes, feel free to substitute milk chocolate or white chocolate if you prefer a sweeter or creamier flavor.
→ How long can I store these bars?
These bars can be stored in an airtight container in the fridge for up to a week.
→ Can I make these bars gluten-free?
Absolutely! Just use gluten-free biscuits instead of regular digestive biscuits.
→ What can I do if I don't have peppermint extract?
You can use crushed peppermint candies or a mint liqueur for a more intense flavor.
Chocolate Mint Slice Bars
Created by: Sienna Brooks
Recipe Type: Dessert Inspirations
Skill Level: Intermediate
Final Quantity: 12 servings
What You'll Need
Chocolate Base
- 200g digestive biscuits, crushed
- 100g unsalted butter, melted
- 50g cocoa powder
Mint Layer
- 300g powdered sugar, sifted
- 150g unsalted butter, softened
- 2 tsp peppermint extract
- Green food coloring (optional)
Chocolate Topping
- 200g dark chocolate, chopped
- 50g coconut oil
How-To Steps
In a large bowl, combine the crushed biscuits, melted butter, and cocoa powder. Mix until well combined. Press this mixture into the bottom of a lined baking dish and set aside.
In a separate bowl, beat together the sifted powdered sugar, softened butter, peppermint extract, and food coloring until smooth. Spread this mint mixture evenly over the chocolate base, smoothing the top with a spatula.
In a saucepan, melt the chopped dark chocolate and coconut oil over low heat until smooth. Pour this mixture over the mint layer, spreading it evenly. Chill in the refrigerator for at least 2 hours or until set.
Once set, remove the bars from the baking dish and cut them into squares. Serve chilled and enjoy the delightful combination of chocolate and mint!
Extra Tips
- For an extra touch, sprinkle some crushed peppermint candies on top of the chocolate layer before it sets. This adds a great crunch and a festive look to your bars!
Nutritional Breakdown (Per Serving)
- Calories: 380 kcal
- Total Fat: 26g
- Saturated Fat: 15g
- Cholesterol: 195mg
- Sodium: 85mg
- Total Carbohydrates: 32g
- Dietary Fiber: 3g
- Sugars: 24g
- Protein: 6g